Multiplayer flash game with SmartFoxServer
Konstantinos Egkarchos / December 4, 2013
Lately I’ve been at work with multiplayer games, and for that purpose I’ve used mostly SmartFoxServer. There are other alternatives, like Photon which is programmable in C#, but I prefer SmartFox because it is installable in a linux box, which I mostly use (and is cheaper in Amazon S3). I’ve noticed that SmartFox didn’t have lots of basic tutorials that explain the process as simple as it can be to test it, so I will be creating one. Also I’m doing this just to have a reference. So without further ado, let’s start.
First of, we need to download the server and the flash API. I’m going to test this locally ( to test it remotely it requires only one(1) file edit! ), so I’m going to download the Winx64 version from Community Edition and from Client API tab the ActionScript 3 API. To install the server just click on the executable, and when it’s time for the Destination Directory change it to your home folder. If you use your Program Files directory it will require Administrator Privilages and since it’s going to be a test use I don’t want to mess with these. My personal destination folder is C:\Users\konsnos\SmartFoxServer_2X. The next important choice is if to install as a service. Well, for test purposes I didn’t and unchecked the box. For production it may be useful, but in development we are going to restart it a lot of times and that’s why we need it as a standalone. You are now ready for the installation.
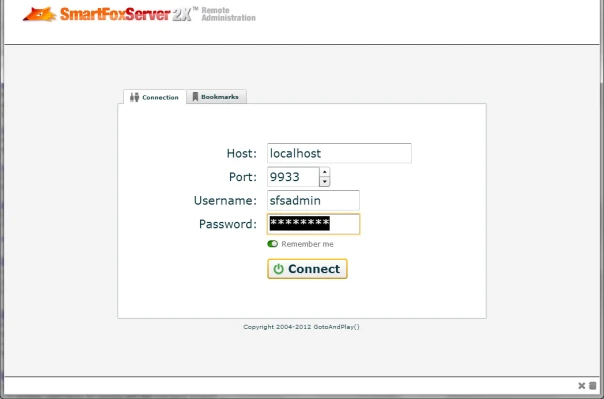
When installed, just find sfs2x-standalone and run it. It’ll open a command line and when it outprints READY! you are ready. To view your admin panel just open your browser and hit http://localhost:8080/admin/. In Host input just type the domain without any prefix or suffix. Default username and password is sfsadmin. Then simply Connect.
Then you are in. :) We’ll check out the Admin Panel later but you can have a tour on your own. Basic usage comes from the Administration modules to your left. Let’s continue with your client. As I said before we are going to make a Flash app. My preferred IDE is FlashDevelop (FD), and I’m not going to explain the installation process because it’s just Next, next and next, but you can easily use your own, as long as you know how to add a swc to your project.
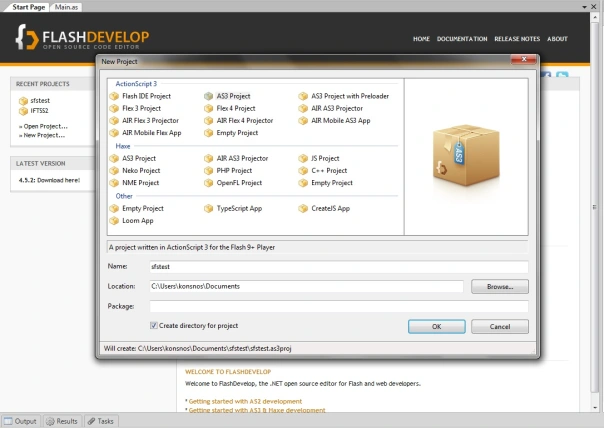
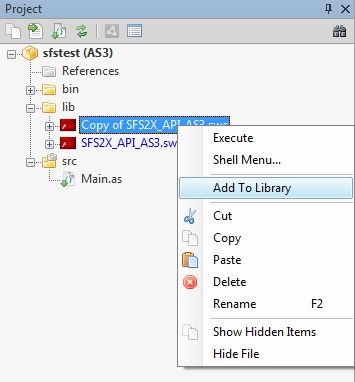
So let’s start by creating our project. From the Start Page click on New Project.. and then select AS3 Project (of course it works with everything), and after you type in your name create your project. In our lib folder add the SmartFox swc. Just a note here, the swc has autocomplete but due to unknown to me reasons it doesn’t work in FlashDevelop without a trick. You may continue to the code and check if you have it or not and come back here to fix it. You just nead to rename SFS2X_API_AS3.swc to SFS2X_API_AS3.zip, then extract the files and re-compress it to zip. Then again rename it to swc. After you put the swc file in the lib folder then right click on it and select Add to Library. The file will turn to blue to indicate that it has been added.
Then let’s type in some code.
package
{
    import com.smartfoxserver.v2.core.SFSEvent;
    import com.smartfoxserver.v2.entities.data.ISFSObject;
    import com.smartfoxserver.v2.entities.data.SFSObject;
    import com.smartfoxserver.v2.requests.ExtensionRequest;
    import com.smartfoxserver.v2.requests.LoginRequest;
    import com.smartfoxserver.v2.SmartFox;
    import flash.display.Sprite;
    import flash.events.Event;

    /**
     * ...
     * @author konsnos
     */
    public class Main extends Sprite
    {
        public function Main():void
        {
            if (stage)
                init();
            else
                addEventListener(Event.ADDED_TO_STAGE, init);
        }

        private function init(e:Event = null):void
        {
            removeEventListener(Event.ADDED_TO_STAGE, init);

            _sfs = new SmartFox(false);

            _sfs.addEventListener(SFSEvent.CONNECTION, onConnection);
            _sfs.addEventListener(SFSEvent.CONNECTION_LOST, onConnectionLost);
            _sfs.addEventListener(SFSEvent.CONFIG_LOAD_SUCCESS, onConfigLoadSuccess);
            _sfs.addEventListener(SFSEvent.CONFIG_LOAD_FAILURE, onConfigLoadFailure);

            _sfs.loadConfig();
        }

        private function onConfigLoadFailure(e:SFSEvent):void
        {

        }

        private function onConfigLoadSuccess(e:SFSEvent):void
        {
            trace("Server settings: " + _sfs.config.host + ":" + _sfs.config.port)
        }

        private function onConnectionLost(e:SFSEvent):void
        {

        }

        private function onConnection(e:SFSEvent):void
        {
            if (e.params.success)
            {
                trace("Connection Success!")
            }
            else
            {
                trace("Connection Failure: " + e.params.errorMessage)
            }

            _sfs.addEventListener(SFSEvent.LOGIN, onLogin);
            _sfs.addEventListener(SFSEvent.LOGIN_ERROR, onLoginError);

            _sfs.send(new LoginRequest("user", "", "MyExtension"));
        }

        private function onLogin(e:SFSEvent):void
        {
            trace("Login success: " + e.params.user.name);
        }

        private function onLoginError(e:SFSEvent):void
        {
            trace("Login failed: " + e.params.errorMessage);
        }

        private var _sfs:SmartFox;
    }
}
First you have to load the config (haven’t mentioned it yet), then connect, then log in, then we have not added that code yet, we’ll add it later, but you can do whatever you want by sending extension requests and receiving extension responses. As for the config, you should have a bin directory in your project. If not try compiling your project, and it’ll be created (connection won’t work yet if you try running it). In your bin folder create a file with the name sfs-config.xml and type in the following code
<SmartFoxConfig>

    <!-- Mandatory Settings -->
    <ip>127.0.0.1</ip>
    <port>9933</port>
    <zone>BasicExamples</zone>
    <!-- End Mandatory Settings -->

    <debug>false</debug>

    <httpPort>8080</httpPort>
    <useBlueBox>false</useBlueBox>
    <blueBoxPollingRate>500</blueBoxPollingRate>

</SmartFoxConfig>
Then you can run your flash project, and you’ll see in the console the following output.
Server settings: 127.0.0.1:9933
Connection Success!
Login success: user
So we had a connection and a log in. Pretty nice although useless.
That works but does nothing useful. That’s because there isn’t a code in the server to respond to this request. So it’s time to create the server’s extension to interact with the commands client sends. This can be used for any use but I’ll just create an addition example for teaching reasons. The following server part can be used by any client that you wish, so even if you are developing a game in Unity3D or whatever, this will work too. I am going to use Eclipse as my editor, but of course if you have another preferred IDE that you know how to add libraries and export your code as JAR, go ahead and use it.
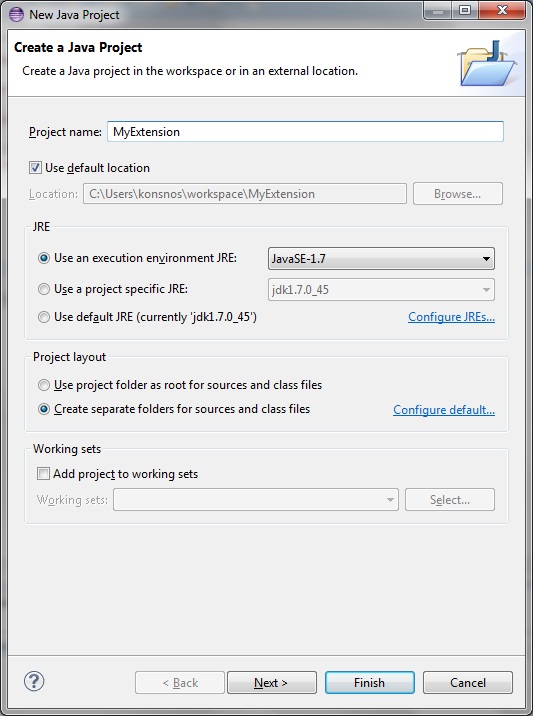
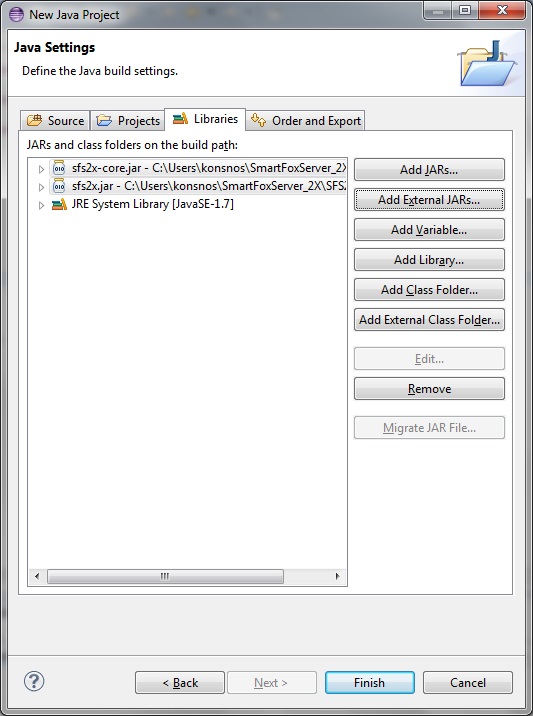
Let’s start by creating a Java Project, and name it MyExtension (you should prefer having a suffix ‘Extension’ in order for your code to be automatically recognized by SmartFox). Click Next, and you’ll get the Java Settings frame. click on the Libraries, and then click Add External JAR. We’ll need to add the SmartFox libraries in our project. Locate folder Installation_Directory\SmartFoxServer_2X\SFS2X\lib and add files sfs2x.jar and sfs2x-core.jar. Then click finish.
Let’s get to code :)
Create a new class, name it as your project MyExtension, and make it so that extends SFSExtension from com.smartfoxserver.v2.extensions.SFSExtension. The extend can be done from the file also if you copy-paste the code I’ll present to you. Then create another class and name it Addition, and extends BaseClientRequestHandler from com.smartfoxserver.v2.extensions.BaseClientRequestHandler. Let’s fill up these classes, shall we?
MyExtension.java
package com.konlab.sfs2x; // this depends on your package if you had another

import com.smartfoxserver.v2.extensions.SFSExtension;

public class MyExtension extends SFSExtension {

    @Override
    public void init() {
        this.addRequestHandler("addition", Addition.class);
    }
}
Addition.java
package com.konlab.sfs2x;

import com.smartfoxserver.v2.entities.User;
import com.smartfoxserver.v2.entities.data.ISFSObject;
import com.smartfoxserver.v2.entities.data.SFSObject;
import com.smartfoxserver.v2.extensions.BaseClientRequestHandler;

public class Addition extends BaseClientRequestHandler {

    @Override
    public void handleClientRequest(User arg0, ISFSObject arg1) {
        int n1 = arg1.getInt("n1");
        int n2 = arg1.getInt("n2");

        ISFSObject rtn = new SFSObject(); // named by 'return'
        rtn.putInt("sum", n1+n2);

        MyExtension parentExt= (MyExtension) getParentExtension();
        parentExt.send("addition", rtn, arg0);
    }
}
What we are doing is listening from the client for the ‘addition’ command and calling the Addition class that we use as the handler of this command. Then the function handleClientRequest supplies as with the sender and the parameters he sent us. We are assuming that the client sent us two parameters and we are exporting them from the SFSObject variable arg1, and then do our calculations. Save our response parameters to an SFSObject and return it back to the user (arg0). That’s how send-receive is done. Let’s continue and put it these function to our server.
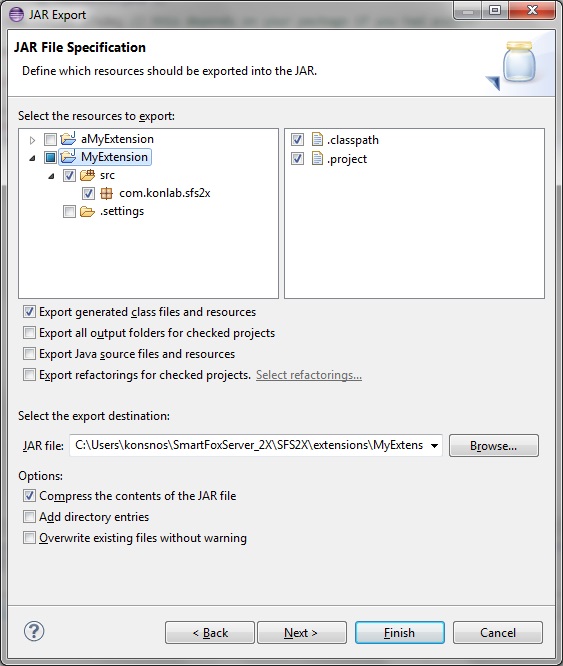
To Eclipse again we want to export our code into a JAR. Click File>Export. From the selection select Java>Jar file, and select Next. Then click on your project and in the export destination in the middle of the window select the destination installation_directory\SmartFoxServer_2X\SFS2X\extensions\MyExtension\MyExtension.jar . Then finish, and the Extension has been added. Let’s check on it.
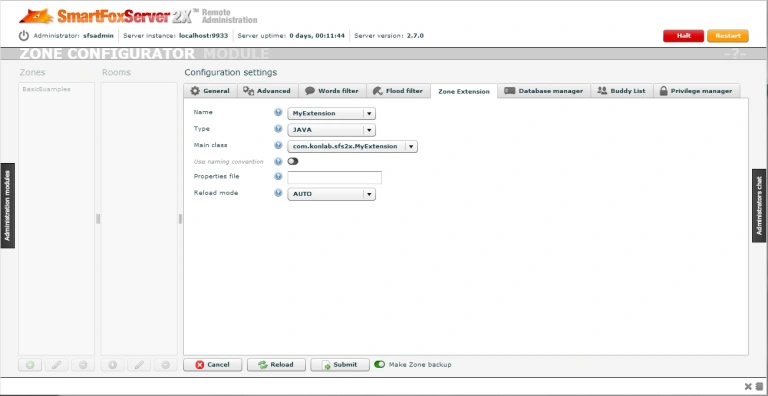
If you have open a SmartFox instance, close it and restart it. If you had open the Admin Panel from earlier that would have log you out so log in again. From Administration Modules on your left, select Zone Configurator. Then in the first column named Zones click the bottom green icon in order to add a new zone (the one we created on Java). In the Zone name of the new parameters that have appeared type the name we previously used MyExtension. Then head to the Zone Extension tab of the same window. In the Type it should be selected Java, and in the name, select the dropdown and then select MyExtension. Lower the Main class should have found its way on its own. You are ready, so click Submit on the lower of your screen.
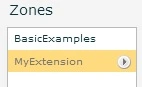
 If everything went fine you should now have the option to start your extension. Of course you should click the right arrow and start your extension. Instead of faded the name of your extension should be the same as the BasicExamples.
 Our server has been set up now. The only thing remaining is to send the command from the client. Let’s go back to our flash code, and alter a little our actionscript class. I’m pasting again the full code so you can copy-paste all of it and override the previous.
package
{
    import com.smartfoxserver.v2.core.SFSEvent;
    import com.smartfoxserver.v2.entities.data.ISFSObject;
    import com.smartfoxserver.v2.entities.data.SFSObject;
    import com.smartfoxserver.v2.requests.ExtensionRequest;
    import com.smartfoxserver.v2.requests.LoginRequest;
    import com.smartfoxserver.v2.SmartFox;
    import flash.display.Sprite;
    import flash.events.Event;

    /**
     * ...
     * @author konsnos
     */
    public class Main extends Sprite
    {
        public function Main():void
        {
            if (stage)
                init();
            else
                addEventListener(Event.ADDED_TO_STAGE, init);
        }

        private function init(e:Event = null):void
        {
            removeEventListener(Event.ADDED_TO_STAGE, init);

            _sfs = new SmartFox(false);

            _sfs.addEventListener(SFSEvent.CONNECTION, onConnection);
            _sfs.addEventListener(SFSEvent.CONNECTION_LOST, onConnectionLost);
            _sfs.addEventListener(SFSEvent.CONFIG_LOAD_SUCCESS, onConfigLoadSuccess);
            _sfs.addEventListener(SFSEvent.CONFIG_LOAD_FAILURE, onConfigLoadFailure);

            _sfs.loadConfig();
        }

        private function onConfigLoadFailure(e:SFSEvent):void
        {

        }

        private function onConfigLoadSuccess(e:SFSEvent):void
        {
            trace("Server settings: " + _sfs.config.host + ":" + _sfs.config.port)
        }

        private function onConnectionLost(e:SFSEvent):void
        {

        }

        private function onConnection(e:SFSEvent):void
        {
            if (e.params.success)
            {
                trace("Connection Success!")
            }
            else
            {
                trace("Connection Failure: " + e.params.errorMessage)
            }

            _sfs.addEventListener(SFSEvent.LOGIN, onLogin);
            _sfs.addEventListener(SFSEvent.LOGIN_ERROR, onLoginError);

            _sfs.send(new LoginRequest("user", "", "MyExtension"));
        }

        private function onLogin(e:SFSEvent):void
        {
            trace("Login success: " + e.params.user.name);

            _sfs.addEventListener(SFSEvent.EXTENSION_RESPONSE, onExtensionResponse);
            askServer();
        }

        private function onLoginError(e:SFSEvent):void
        {
            trace("Login failed: " + e.params.errorMessage);
        }

        private function askServer():void
        {
            var params:ISFSObject = new SFSObject();
            params.putInt('n1', 2684);
            params.putInt('n2', 4356);
            _sfs.send(new ExtensionRequest('addition', params));
        }

        private function onExtensionResponse(e:SFSEvent):void
        {
            var params:ISFSObject = e.params.params as SFSObject;
            switch (e.params.cmd)
            {
                case 'addition':
                    trace("Received addition response with result: " + params.getInt('sum'));
                    break;
                default:
                    trace("Problem?");
            }
        }

        private var _sfs:SmartFox;
    }
}
First of all we’ve changed the LoginRequest to log in to our extension. We shall do that in sfs-config.xml too.
After the log in now we’ve added a new command to send and receive commands from the server. So we’ve added a listener to hear server responses, and we are sending our own. By contrasting these variables with the ones that we’ve used in server code you can undestand how they relate to each other. Library comments will enormously help and SmartFox has lots of them. For further reference you can check the Docs.
Last thing remaining is again the sfs.config.xml
<SmartFoxConfig>

    <!-- Mandatory Settings -->
    <ip>127.0.0.1</ip>
    <port>9933</port>
    <zone>MyExtension</zone>
    <!-- End Mandatory Settings -->

    <debug>false</debug>

    <httpPort>8080</httpPort>
    <useBlueBox>false</useBlueBox>
    <blueBoxPollingRate>500</blueBoxPollingRate>

</SmartFoxConfig>
The only thing we changed here is the zone referencing to MyExtension as the LoginRequest previously. Now we can log in our zone and run the command we’ve added it. Let’s try it. Since smartfox should already be running just run your client code.
So this is my output:
Connection Success!
Login success: user
Received addition response with result: 7040
It worked! If not for you then you should recheck my guidelines, and if you’ve done that then just comment on this post because there is a new version of smartfox up which doesn’t have the implement the same process (or I’ve messed up my guide and I should fix it).
That’s it!!